By: Fred Zeglin
AGI Instructor, Author,Lassen College Gunsmithing Graduate and Cartridge Designer.
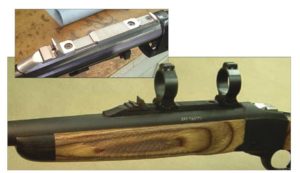
Express Sights NECG is a great source for Express sights as well. They sell bases for mounting the sights in addition to the blank sights. I think many gunsmiths are intimidated by the idea of filing blank sights to the correct height. Truth is, it’s pretty easy. If you can measure and square parts, you can file sights. Express sights should be set to a specified load because the trajectory of the bullet dictates the sight height. Traditionally, express sights have a shallow V notch that reaches the full width of the sight. You can, of course, set the sights up in a mill and machine them. However, this takes far more time than simply filing them. Normally an express sight will have a centerline cut into the blank so all you have to do is decide how deep to cut the V. Step 2: Measure total rear sight height, B. Step 3: Add the totals from Step 1 and Step 2. The combined total is the height of the rear sight from the centerline of the bore. Step 4: Measure barrel outside diameter, C, and divide by 2. Step 5: Subtract the answer from Step 4 from the rear sight height. The difference is the height for the new ramp and sight insert combined. The front sight ramp and insert will determine the depth of the rear V. This is because the banded ramps are available in limited heights. So you will only have one or two options with regard to the height of the ramp. Ramps are measured from the base to the bottom of the dovetails. Front sights are measured from the bottom of the dovetail to the top of the bead. Using the formulas that follow you can get very close to the required cuts on the rear sight. I normally leave the notch about .010″ shallow from the expected dimensions. That way, I can dress it down if necessary and it leaves room for polishing the finished sight. Calculating Front Sight Height Calculating Rear Sight Height C÷2+D= front sight height from the centerline of the bore Step 1: Measure barrel outside diameter, C, and divide by 2. Step 2: Measure total front sight height, D. Step 3: Add the results of Step 1 and Step 2. The combined total is the height of the front sight from the center of the bore line. Step 4: Measure barrel outside diameter, A, and divide by 2. A÷2+B= rear sight height from centerline of bore Step 1: Measure barrel outside diameter, A, and divide by 2 Step 5: Subtract the result of Step 4 from the front sight height. The difference is the required height of the new rear sight. 6 From the previous formula you can use the front sight height to establish the required height of the rear sight. Two tricks to remember when choosing sights: 1. Keep the sights as close to the bore line as possible. 2. If at all possible, choose a front sight insert from a style that lifts at least one taller and one shorter blade. This insures the client will be able to match the sights to a new load at a later date. Let’s set up an example using a common load for a .375 H&H. We will assume a 300 grain bullet at 2600 feet per second. You can use ballistic software to create a ballistics drop chart for the load or you can simply use a reloading manual that contains such charts to determine the zero points best suited for the load. Obviously, 50 yards and 100 yards are virtually identical in terms of zero. You will find this is true with most calibers. The difference between 50 and 100 yards is usually less than 2 inches, no matter the velocity or bullet. Trajectory comes into play after 100 yards. The number of flip-up blades on the rear express sight will dictate the zero points you select. If you had three flip-up blades, with the above chart, I would recommend the fixed blade be set to 50 yards as is traditional. Then, I would skip to either 150 or 200 yards for the first flip-up, then 50 yard increments for the rest. I counsel clients not to exceed 300 yards with express sights. With an open V sight, it takes a fair amount of practice to be accurate at 300 yards or longer. More important is the fact that 95% or more of iron sight shots are made with the fixed leaf. I also try to counsel clients to use express sights with only one or two flip-up leafs. Mainly I do this because they will never use the other leaves anyway and it costs them unnecessary expense to have them all filed in. With a single flip-up and the chart below, I would set the fixed leaf for 50 yards and the flip-up for 200 yards. It’s just a more realistic use of the sights by the hunter. It’s also my opinion that three and four leaf express sights are what people think of when they think express sights. For this reason, a one or two leaf express appears to be more custom. Filing the sight requires a little care. Once I have used the formula to determine the depth of the rear notch, I strip the sight so only the standing leaf is in place. I use machinists blue and a scribe to mark the depth I will be filing. I rough a V notch with the corner of a square file and then widen out the V once I have the depth cut. Always leave yourself a few thousandths for final clean up, plus its easier to cut more off than to put it back. Tape off the areas where your file might bump so you don’t have to clean up marks later. I actually test fire at the ange at this point. I take along a rifle vise and a couple of files to finalize the height. This is for roughing the sight blank. I always finish the sight back in the shop where I have good working conditions. Once you have proven the fixed blade at the range, you can use it as a reference for the folding leaf sights. You already know from your drop chart how many inches of adjustment are needed at the given range you have selected. Sight makers offer sight error charts that combine your sight radius (distance between front and 7 rear sight) and error at the target to tell you how much change in sight height you need. The flip up rear blades will always be taller than the fixed blade so you simply use machinists blue and mark where you will file to. It’s just that simple. Custom Quarter Ribs Express sights are often used in conjunction with quarter ribs. The example shown on the bottom of page 7 shows a quarter rib fit and soldered to a barrel. Notice the single leaf express sight and the shallow V notch that extends to the edge of each blade. Here we have the beginnings of a custom rib for a Ruger® #1. The client wanted to use Talley 30mm rings. The factory quarter rib will only work with Ruger® rings. In this case the client is using the factory barrel so we opted to utilize the existing screw and pin holes to mount the rib. Also, on a Ruger® #1 the rib has to be removable to allow removal of the barrel from the receiver. Notice the rib is mounted to the gun for machining of the scope mounts and the dovetail for the sight. This insures that all these parts are aligned to the bore of the rifle. This barrel was reamed for a larger cartridge so the marking has been polished off in preparation for a new caliber marking. Above, you can see where the factory recoil pin and screw holes are being utilized to mount the new rib. The rib is machined in a mill to match the contour of the barrel. We needed a wider rib to provide a base for the new rings and the new express rear. Low carbon ground stock was used to provide a blank. Low carbon means it’s easy to machine and will blue well. Since this steel arrives ground square, set up for machining is easy. Quarter ribs should always have a gap between the rib and the receiver. Three to five thousandths (.003″ to .005″) is enough. More looks like, and is, poor quality fitting. This gap prevents a bind between the rib, barrel, and receiver which would cause accuracy issues. The sight was positioned to avoid contact with the scope turrets. Sight height must be low enough to clear the scope as well. Features like custom sights and quarter ribs can make an average rifle into a custom rifle with minimal changes to the gun. They are high value additions the client can appreciate without much salesmanship on your part. Since most gunsmiths do not offer these services, they represent an opportunity for you to build clientele and offer a service that the big box stores can never compete with.