
Gunsmith of Williamsburg
By: Robert Dunn
One of my childhood vacation spots was Colonial Williamsburg, Virginia. My Parents met one another in Virginia when they were in college after WWII had ended. My Dad went to V.P.I. and my Mom was going to William and Mary College (right next to Colonial Williamsburg). Virginia is my birthplace and I enjoy visiting there. It was easy to find my Dad and I in Colonial Williamsburg, just go to the Gunsmith’s Shop! Why would you go anywhere else, you might miss something cool happening at the forge! I was visiting my friend Ken Brooks one weekend and he was wearing a Colonial Williamsburg T-Shirt and that spawned a long conversation about one of my favorite vacation spots. We got to talking about an old video that I had watched called Gunsmith of Williamsburg (1969). Ken smiled and dug out a copy of this excellent documentary. His wife, Beth, rolled her eyes and begged Ken not to play that video again! It has become a running joke when I visit that we are going to watch it. The bad thing is, is that we usually do watch it again! Ken and I are both big fans of muzzleloaders and this movie never gets old or boring. It’s like a warm fire on a cold day!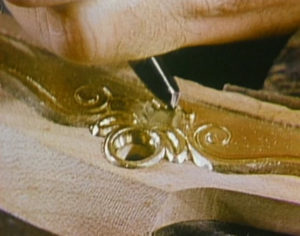
Gusler engraving a brass plate.
The documentary, The Gunsmith of Williamsburg, showcases the work of Master Gunsmith, Wallace Gusler. I have had the chance to see some of his rifles in person and they are really fine examples of precision work achieved with hand-tools. A gunsmith back in the colonial times needed to possess the skills of; a woodworker, a carver, a blacksmith, an engraver, a machinist, a silversmith, a tool maker. The gunsmithing program in Colonial Williamsburg was started in 1963 by Mr. Gusler, who was only twenty years old at the time. Gusler was a self taught gunsmith from Virginia and was extremely passionate about gunsmithing. Wallace grew up hunting and fishing and he always had an interest in firearms. He built his first pistol when he was a kid. He made his own parts and got the springs from a Model-T. He was even given permission by his High School principal to build a reproduction of a 19th century rifle in shop class (ahh, the good ol’ days!). It was that rifle that got him the job at Colonial Williamsburg! Some of the tasks that were accomplished when instituting the gunsmithing program were building a boring machine and a rifling machine. It takes over 300 hours of labor to make each one of the flintlock rifles made at the Gunsmith’s Shop. The process is quite intense. First, a solid bar of wrought iron is put in the forge and heated and hammered into a long flat tapered skelp. The skelp is then folded lengthwise on a swage block. The edges will eventually be welded together with flux and the use of heat and a hammer. The flux is made of borax, iron filings and sand. The flux melts over the surface of the iron to prevent scaling. This operation is performed on a mandrel so that the bore does not collapse. The process of heating and hammering takes place several hundred times before the barrel is formed. The rifled barrels are formed into an octagon shape, mostly for looks. The barrel is heated to a dull red and then cooled in cinders to anneal or soften the barrel.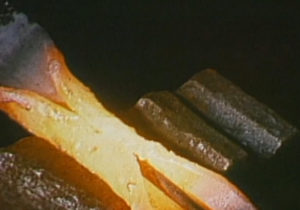
Barrel being made from an iron skelp being hammered around a mandrel on a swage block.
Next, a straight, smooth hole is bored through the barrel with a hand operated boring machine. The barrel is mounted in a sliding carriage and a long bit is installed in a chuck. The bit is turned by a huge crank and the barrel is slid into the bit to cut the hole. Larger and larger bits are used gradually, until the correct diameter hole is bored in the barrel. The barrel borings are saved and used to make the flux. A square reamer installed in the chuck finishes the job by creating a mirror-like finish on the inside of the barrel. Now, the rough forging marks are removed by doing a whole lot of filing. The muzzle end is filed even so that the barrel is centered. After filing down the flats of the octagonal barrel, the rifling process begins.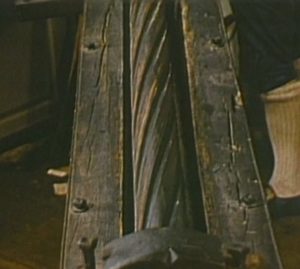
Spiral guide that mimics the rifling being cut in the barrel.
A rifling machine that is hand powered is employed to cut the spiral grooves in the bore of the barrel (the rifling). All of the rifling is cut from the breech to the muzzle by two steel teeth set in an iron rod. The iron rod is pinned to a spiral guide. The guide produces the same spiral pattern on the inside of the barrel when the rod is pulled through the barrel. Thin paper shims are added to cut the spirals to the desired depth. Next, an iron breech plug is forged, threaded and fitted to close up the breech end of the barrel. The tang of the breech plug is used to hold the breech end of the barrel into the stock. The last step on the barrel is to drill the touch hole. To make sure that the barrel is safe, it must be tested/proofed. This is done by loading four times the normal load of powder, a patch and a ball and firing the gun from a safe distance by creating a long powder trail for ignition. The barrel is then closely inspected for cracks, swells and damage, both inside and out.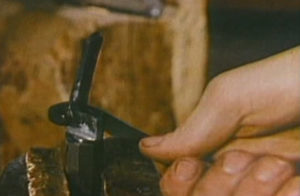
Breech plug being screwed into the barrel.
The intense process of making the parts for the lock/firing mechanism takes place next. These parts include the cock, lockplate, hammer, anvil, bridle, tumbler and sear. The cock is forged and then filed into shape. The lockplate and cock are made to fit one another. Then, all the other internal parts are made in proportion to the lockplate and cock. Each part takes about two to three hours of filing. Wallace makes all of the screws and pins that are needed for the firearm as well. Most of the tools that Gusler uses he makes himself, except files and hacksaw blades. The other parts of the trigger mechanism, the trigger and mainspring are custom made and fit. The springs (three springs total) in the gun are the most difficult to make, as the forging is more delicate and hammer when it is too cold will actually damage the fibers. Even if the springs are not highly polished they can easily break. It can take up to 3 or 4 heatings to safely be able to bend the spring all of the way into a V-shape. After the springs are shaped and fitted, they are tempered in lead and heated to the boiling point. The parts are then quenched in linseed oil. At this point, the parts are very brittle. After some polishing, the springs are heated on a bar in the forge to a pale blue color to anneal them so they are flexible.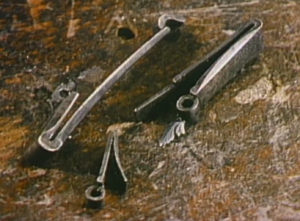
The three finished springs (mainspring, frizzen spring, sear spring) after the annealing process.
The gunsmith’s engraving was a way for them to express their individuality. A combination of C scrolls, S scrolls, flowers, leaves and shell designs make up most of the engraving patterns. Many of the parts are case hardened by burying them into a crucible covered up with powdered charcoal, ground charred bone and charred leather. The crucible and parts are heated to a red hot in the forge. The surface of the iron will then absorb carbon and be converted to steel, while the body of the parts maintain the resiliency of wrought iron. The surface of the parts are hardened when they are quenched in water. The next stage in the process to cast the brass mountings in sand and charcoal molds. Fresh scraps are added to the brass because the zinc boils out of the brass, which leaves too much copper in the mix. The molten brass is poured into the molds to form the various parts.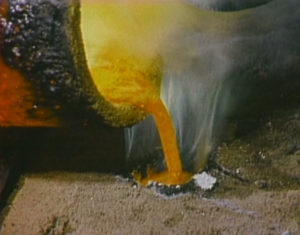
Boiling brass being poured into the mold to cast the mountings.
Curly maple is a good choice for the wood used for the gun stock. The wood is typically dried for at least two years to cure it. Then a stock blank is roughly cut from the wood plank. The carving and woodworking involved in the process of carving the stock really showcased the artistry in the gunsmith. The barrel needs to first be bedded to the stock. Then, all of the other parts are proportioned to it. The breech plug must be inlet in the stock. The channel for the barrel is roughed out with gouges and then smoothed with an octagon shaped plane. The barrel is fit by sooting the barrel over a candle and then pounding it into the stock. This allows you to see and remove all of the high spots until you have a perfect fit. The bottom of the stock is then carved out to fit the ram rod. Next, the butt plate is roughly fitted to the stock. Each screw on the firearm is custom made, so they should always go back into the same hole/spot that they came out of. Sharp tools are the key to success when carving and shaping the rest of the stock. The stock is then carved down and roughly shaped. The final shaping and finishing will come after all of the other parts are inlet and fit into the stock.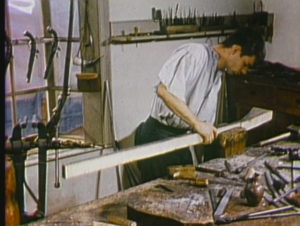
Wallace Gusler with a rough cut stock is a vise.
The stock is inletted for the lock. You want to try and remove as little wood as possible so that the stock will retain its stability. The sideplate allows the lock to be held in place by two screws. The sideplate is also a decorative piece is usually heavily engraved. The trigger and trigger plate are hammered into shape and fitted into the stock as well. The tang screw goes through the stock and threads into the trigger plate, which strengthens this area of the stock. The woodworking is finished after all of the parts are in and fitted (including the trigger guard). To mount the barrel, four dovetails are cut into the bottom flat of the barrel. Brass loops are formed to go into the dovetails. The loops are then fit and inlet into the stock. The barrel will be pinned to these loops after holes are drilled for the pins in both the stock and the loops.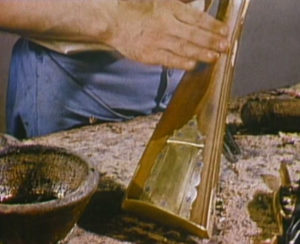
Stain being applied to the firearm.
The patch box still needs to be made. The hinge on the patch box is a very difficult piece to make and fit because of the way the parts fit. Then you must drive a pin through the hinge. Once the patch box and its sideplates are fit into the gun, the thimbles that hold the ram rod in are bent to shape out of brass. The entire firearm is both functional and artistic. You can really see the gun becoming a beautiful piece of work at this point. The engraving that is done on the stock, lock and brass pieces is really astounding. A deep reddish brown finish is attained by using iron filing dissolved in aqua fortis (nitric acid), to make a stain. After applying this stain to the stock, it is heated and the red begins to burst out. Next, linseed oil is rubbed in during several applications.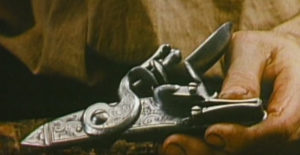
Pictured here is Gusler’s flint lock
The iron rear sight is added and then the front sight is added. It is made of silver with an iron base. Once matching bullets and a bullet mold is made, the gun can be fired and admired.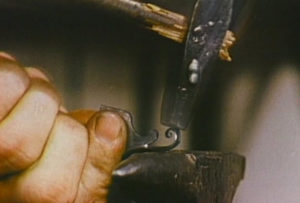
Gusler hammering the trigger into shape.
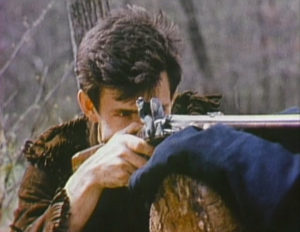
Wallace Gusler test firing his finished firearm!
The work of Wallace Gusler is truly amazing. The Gunsmith of Williamsburg is a must see documentary. The images and information for this article came from this wonderful film. To purchase the DVD and find out more about Colonial Williamsburg and the Gunsmith’s Shop, visit their website at: https://shop.colonialwilliamsburg.com/Gunsmith-Of-Williamsburg-DVD/