Using a Laser Boresighter
By: Jack Landis
I’ve been using laser boresighters in my shop for years, and I wouldn’t be without one. They are, in my opinion, the fastest, easiest, way to square up the scope’s crosshairs and get your first shot within a foot of your aiming point at 100 yards.
I’ve got a small target with a 1/4” grid hung up on my shop wall about 12 feet from the “Versa-Vise” on one of my benches and an inch or so higher than the top of the vise. It is hung with its center on a vertical line I drew on the wall using a permanent marker and a level. I have already leveled the vise, but after I clamp the gun in it, I check the gun to make sure that it is level, side to side. Then I put the boresighter into the muzzle of the barrel with the proper spacers for the caliber and with the switch on the top. Some boresighters are not round all the way along their bodies and always “hang” in the same position. If they do not, make a mark on the body so that you can always put that mark “up”. I then swivel the vise around so that the laser dot is on the vertical line and then tilt the muzzle up or down until the dot is on the center of the target. The scope is then rotated in its rings until the vertical crosshair lines up parallel with the line on the wall.
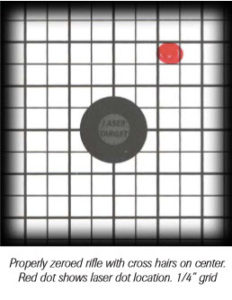
I tighten the clamping rings and then adjust the windage screw until the vertical crosshair goes through the center of the target (and laser dot). Using a scale or ruler (this doesn’t have to be precise), I measure the distance between the bore center and the scope tube center. Using the scope’s elevation screw, I adjust the cross hair until it is just that same distance above the laser dot. If you then move it closer to the dot by about 1/6th to 1/8th of that distance, you will be within a few inches of the target at 25 yards and a few inches higher than that at 100 yards. After you shoot your groups and finish sighting in the rifle, put the boresighter back in (same side up, remember?) and see where the dot appears on the target at 25 yards when the cross hairs are centered. Cut out a 6” square of the center of the target and mark where the laser dot was. Keep the target in a plastic zip-lock sandwich bag with the rifle. You now have a great way to check the zero of your rifle in the field without having to fire a shot and spook the game. Let’s say that you are elk hunting and riding on horseback up the steep mountains. Your horse slips on the ice, rocks, mud, or whatever and down he goes! You, being alert and ready for anything (or just real lucky), manage to get your boot out of the stirrup he’s going to flop on, and end up sitting on the side of the horse while he’s lying on the only rifle you brought with you. Oops!! Big time bad news! Is the scope knocked out of line? You can’t tell by looking if it isn’t knocked off or bent. If you brought your boresighter and the little target with you, you are in high cotton. Hang the target from a twig or prop it up on a rock, pace off 25 yards, stick the boresighter in your barrel (again, marked side up), get in a solid sighting position and place the cross hairs on the center of the target. Is the laser dot where it is supposed to be? Yes? Hooray, you are still zeroed! If it is not, move the windage and/or elevation dials on the scope until the cross hairs are centered on the target and the laser dot is where it was marked to be. Bingo! Sighted in again! No noise, no muss, no fuss, no strain.