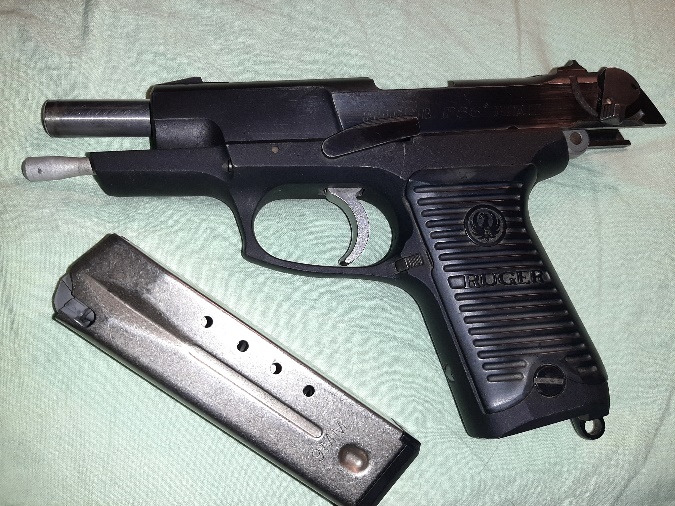
Figure 1: The P85 Ruger’s early entry into the 9mm semi-auto market. The lanyard loop at the base of the grip shows its heritage of being entered in the US army’s 1984 competition to replace the venerable .45 Colt 1911.
The other day, a customer brought in a problem that except for a bit of luck, it was almost a stumper. He had a Ruger P85, (shown in Figure 1), that would not break down for cleaning. I wasn’t too alarmed at first. I like and own several Ruger firearms. Several of them have some rather strange conventions regarding taking them down for cleaning. For example, Ruger Standard, and Mark II-III are good examples.
Figure 2: To disassemble the P85 for cleaning, you must first lock the slide back and press the ejector down to clear the slide.
The P85 is a full-sized, all-metal 9mm semi-auto that is hammer-fired. As with any semi-auto pistol, the first steps were to make sure the magazine was out, the chamber empty, and the safety set to “ON”, and with the white dot showing. I downloaded the manual and looked for instructions. They were unusual – with the slide locked back, you have to reach down through the ejection port with your finger and push the ejector down into the magazine well. At first, I could not help wondering if this wasn’t a new approach to acquiring an “M1 thumb”. However, with the appropriate caution, my finger remained uncrunched. Figure 2 shows the slide locked back and the ejector pushed down to clear the slide.
Basic Problem
Figure 3: With the slide stop pulled out to the take down position, the slide would not leave the frame.
What you are supposed to be able to do next is release the slide and let it move forward to the point where you can push out the slide stop. Ruger came up with a way to capture the slide stop, eliminating the need to completely remove it. The slide-stop retaining spring is set into the side of the frame. Trust me, you do not want to remove it. As shown in Figure 3, the slide is supposed to simply slide straight forward off the rails, retaining the barrel, guide rod, and recoil spring as a complete sub-assembly. That was the customer’s problem – the slide would move to its usual position and lock up.
Reversing the process resulted in a pistol that would fire reliably. Thinking it was possible that some debris was jamming the action, the owner tried using an ultrasonic cleaner to clean the pistol. After it dried, it functioned reliably, but would still not break down. That is when I received the pistol. Following the above procedure, it did the same thing for me. I could not remove the slide from the frame using the recommended procedure.
This project had three aspects:
First, I had to successfully disassemble the pistol.
Second, once disassembled, diagnose the cause of the problem.
Third, return the pistol to a functional condition with all features intact.
I restored the pistol to firing condition and walked through the procedure with no success. Observing the barrel-slide relationship during the attempts, it was clear that the barrel was locking up firmly between frame and slide even with the slide-stop pulled all the way out to its stop. Removing the stocks from the frame provided no additional clue. I locked the frame in a vise and attempted to tap the slide off with a brass hammer.
No luck.
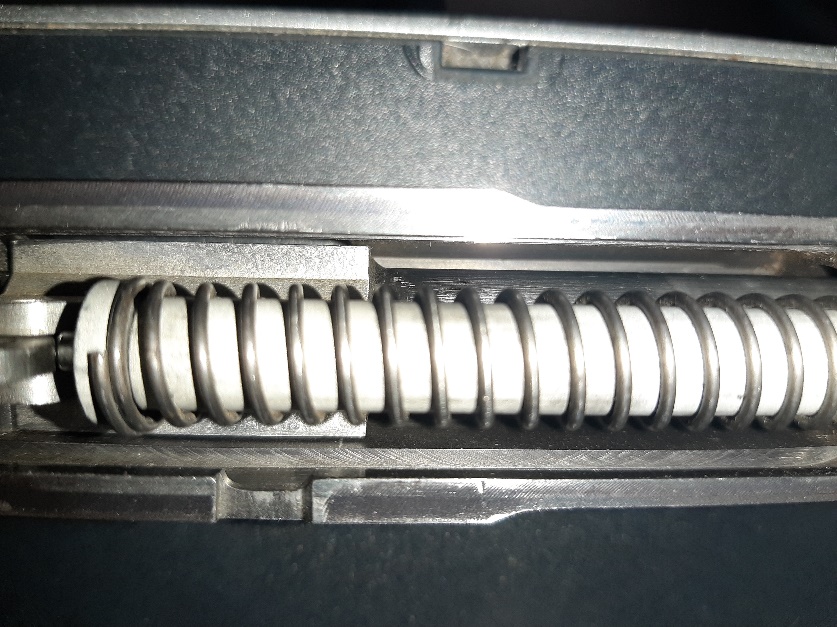
Figure 4: The P85 slide sub-assembly with the recoil spring riding up over the end of the guide rod
Whatever was holding the pistol together, was buried deep inside the frame where I could not see it. I attempted to insert a thin flexible spring steel probe from the front with no success. I tried inserting the probe up through the magazine well and into the space between the slide and frame. Whether that worked, or I got lucky, I do not know. However, my next attempt to walk through the procedure saw the slide move forward an additional 1/8th inch before sticking. I tapped the rear of the slide sharply with the heel of my hand and the slide assembly reluctantly began to slide off the frame. A couple more taps resulted in my holding the problematic slide in my hand. I examined the slide and Figure 4 shows what I found. The recoil spring’s open end was riding up over the rim of the spring guide rod. The tolerances within the pistol are so tight causing the problem.
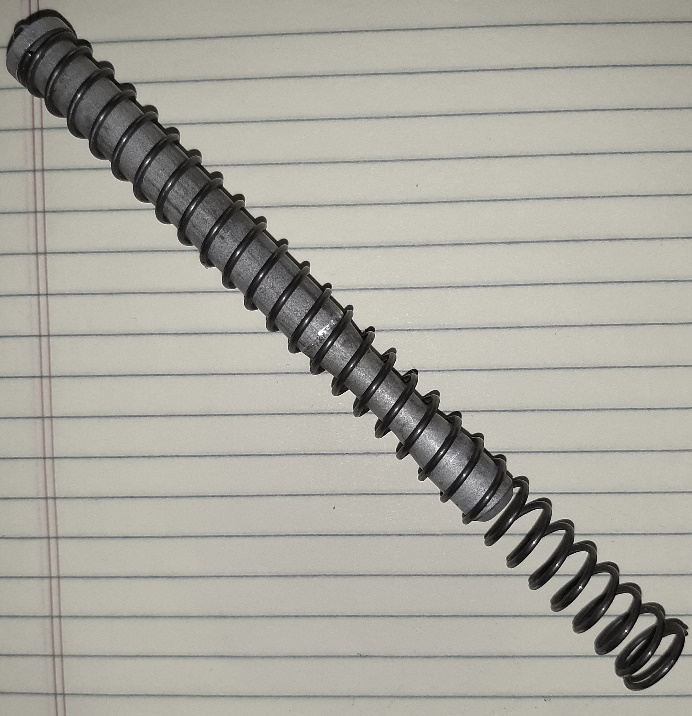
Figure 5: Recoil spring and guide rod. The spring is slightly flared on one end. The closed end fits tightly over the guide rod and fits into the groove at the base of the rod.
The recoil spring is coiled spring steel that is closed on one end, and very slightly flared and open on the other. Figure 5 shows the recoil spring and guide rod. The flare at the lower right end of the spring is barely noticeable. The upper left end fits very securely on the guide rod. The flared end is supposed to fit into the front of the slide when reassembling the pistol after cleaning.
Ruger did a very nice thing here. With the expanded end fitting snuggly into the end of the slide, and the closed end secure on the guide rod, parts are much less likely to go flying when the pistol is torn down for cleaning. If, however, the unsuspecting user reverses the spring because it goes together more easily, problems might well occur. The pistol goes together easily with the spring in the wrong position, and if nothing causes it to ride up over the rim of the guide rod, it will break down exactly as designed.
The Recoil Spring
Figure 6: Correct assembly of guide rod and recoil spring
Correct Assembly
Figure 6 shows the correct orientation of the recoil spring when inserted on the guide rod. The closed end drops slightly into the groove shown in Figure 5, helping to keep the spring in place during assembly and disassembly. The flared end requires some pressure to fit into the end of the pistol slide, and requires some pull to get it to disengage. To an individual inexperienced with the pistol, this could lead them to assume the spring installs are reversed.
Conclusion
Mel Brooks in History of the World: Part I, repeated the phrase “It’s good to be the King.” I would say “It’s good to be Lucky.” I freely admit that luck may have played a significant role in getting the spring to slip off the rim and let the slide off the frame. When I tried to tap it off with the brass hammer, I was very concerned about damaging something internally. Continually cycling the slide and then attempting to break it down, may have caused the spring to slip off the guide rod rim. It is also possible the flexible bit of metal that slid up through the grip may have pushed it off. Either way, the pistol is restored to function and returned to the happy customer.
Ken Finley

 The P85 is a full-sized, all-metal 9mm semi-auto that is hammer-fired. As with any semi-auto pistol, the first steps were to make sure the magazine was out, the chamber empty, and the safety set to “ON”, and with the white dot showing. I downloaded the manual and looked for instructions. They were unusual – with the slide locked back, you have to reach down through the ejection port with your finger and push the ejector down into the magazine well. At first, I could not help wondering if this wasn’t a new approach to acquiring an “M1 thumb”. However, with the appropriate caution, my finger remained uncrunched. Figure 2 shows the slide locked back and the ejector pushed down to clear the slide.

 Ken Finley